Chocolate Strawberry Tartlets
Highlighted under: Favorite Baking Ideas
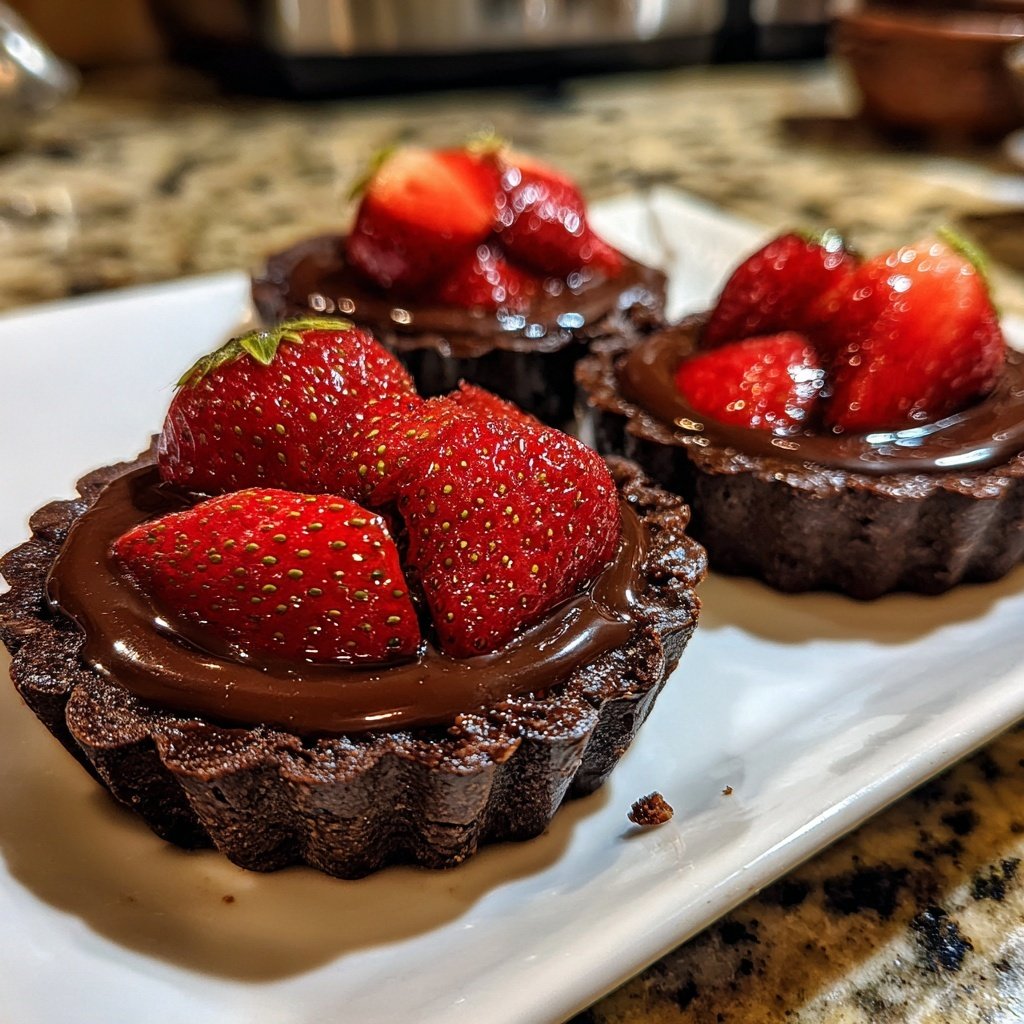
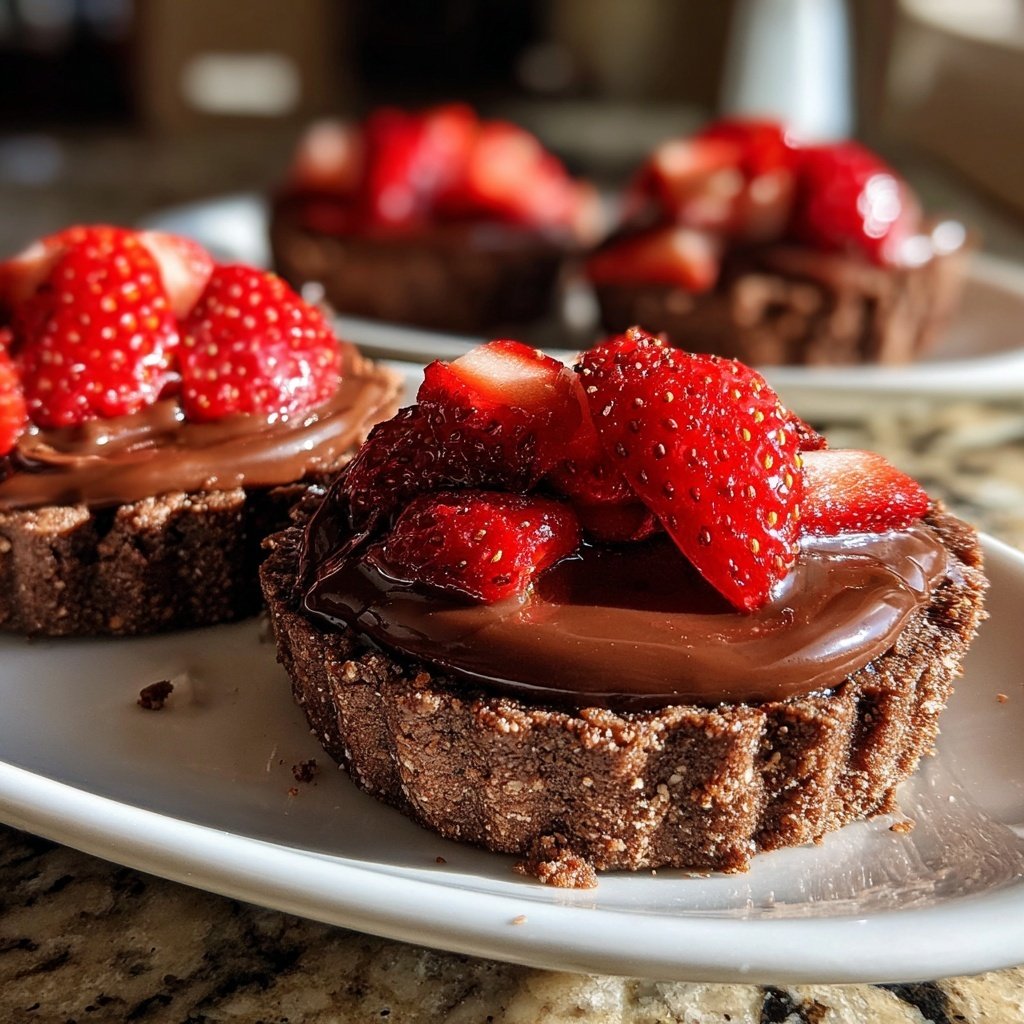
I absolutely love making Chocolate Strawberry Tartlets for special occasions. Every time I prepare these delightful treats, I’m amazed by how the rich chocolate pairs so beautifully with the freshness of strawberries. The tart crust is buttery and crisp, providing the perfect contrast to the creamy chocolate filling. If you want a dessert that feels elegant yet is surprisingly easy to assemble, these tartlets are for you. They not only look stunning on a plate but also bring joy to everyone who takes a bite.
When I decided to host a dinner party, I wanted a dessert that would impress yet be simple to make. That’s when I stumbled upon the idea of Chocolate Strawberry Tartlets. Preparing the tart crust from scratch was a fun experience, and I loved how the buttery flavor complemented the rich chocolate ganache. The tartlets come together so beautifully, and once topped with fresh strawberries, they present a stunning finish.
One of the best tips I can share is to let the chocolate filling cool slightly before pouring it into the tart shells. This way, the chocolate sets perfectly without making the crust soggy, maintaining that delicious crunch. Each bite is a delightful mix of textures and flavors, making these tartlets a favorite in my home.
Why You'll Love These Tartlets
- Decadent chocolate that satisfies every sweet tooth
- Fresh strawberries that add a burst of flavor
- Elegant presentation perfect for any occasion
Mastering the Tart Crust
The tart crust is the foundation of your Chocolate Strawberry Tartlets, and getting it right is essential for a successful dessert. Using cold, cubed butter helps create a flaky texture, while the granulated sugar adds a subtle sweetness. When mixing the ingredients, aim for a coarse crumb texture before adding the egg yolk and ice water. Avoid overworking the dough; it should come together without being excessively kneaded to ensure it stays tender after baking.
Make sure to chill the dough for at least 30 minutes before rolling it out. This resting period allows the gluten to relax, preventing shrinkage during baking. When rolling the dough, keep the surface lightly floured to avoid sticking, and use a round cutter to ensure even shapes that fit your tartlet pans perfectly. If you're short on time, you can prepare this crust a day in advance and store it in the fridge, wrapped tightly.
Creating the Perfect Chocolate Filling
A rich chocolate filling is the star of these tartlets, and the quality of chocolate used significantly impacts the final flavor. Opt for high-quality dark chocolate with at least 60% cacao for a deep, intense flavor. When heating the cream, keep a close eye on it; you want it to simmer but not boil. If the chocolate doesn't melt completely, return the mixture to low heat for a few seconds while stirring until glossy and smooth.
For a varied flavor profile, consider enhancing your chocolate filling with a touch of espresso powder or a splash of orange liqueur. Both additions complement the chocolate beautifully and can elevate your tartlets to a new level. Allow the filling to cool to room temperature before refrigerating; this ensures it sets properly, resulting in a luxurious, silky texture that pairs beautifully with the crisp crust.
Garnishing and Serving Suggestions
When it comes to garnishing your tartlets, the fresh strawberries should be the highlight. Choose berries that are ripe and vibrant in color for the best flavor and visual appeal. After slicing, fan them out across the chocolate filling for an elegant look. If you're preparing these in advance, add the strawberries just before serving to prevent them from releasing moisture and making the tartlets soggy.
These Chocolate Strawberry Tartlets are perfect for special occasions or as a delightful treat after dinner. For a playful twist, consider drizzling a homemade berry coulis over each tartlet at serving time. It not only adds an extra layer of flavor but also enhances the presentation. Store any leftovers in an airtight container in the refrigerator, where they will keep nicely for up to two days, although the crust may soften over time.
Ingredients
Gather these ingredients to create the perfect Chocolate Strawberry Tartlets:
For the Tart Crust
- 1 ½ cups all-purpose flour
- ½ cup unsalted butter, cold and cubed
- 1/4 cup granulated sugar
- 1/4 teaspoon salt
- 1 egg yolk
- 2-3 tablespoons ice water
For the Chocolate Filling
- 1 cup heavy cream
- 8 oz dark chocolate, chopped
- 2 tablespoons unsweetened cocoa powder
- 1/4 cup powdered sugar
- 1 teaspoon vanilla extract
For the Topping
- 12 fresh strawberries, hulled and sliced
- Whipped cream (optional) for garnish
With these fresh and delicious ingredients, you're set to make the most amazing tartlets!
Instructions
Follow these easy steps to create your Chocolate Strawberry Tartlets:
Make the Tart Crust
In a large bowl, combine the flour, butter, sugar, and salt. Use a pastry cutter or your fingers to blend until the mixture resembles coarse crumbs. Add the egg yolk and ice water; mix until the dough just comes together. Form the dough into a disk, wrap in plastic wrap, and chill for 30 minutes.
Bake the Crust
Preheat the oven to 350°F (175°C). Roll out the chilled dough on a floured surface and cut into circles to fit your tartlet pans. Press the dough into the pans and prick the bottoms with a fork. Bake for 12-15 minutes or until lightly golden. Remove from the oven and let cool.
Prepare the Chocolate Filling
In a saucepan, heat the heavy cream over medium heat until it just begins to simmer. Remove from heat and add the chopped dark chocolate, cocoa powder, powdered sugar, and vanilla extract. Stir until smooth and fully combined.
Assemble the Tartlets
Pour the chocolate filling into each cooled tart crust, filling them to the brim. Allow the tartlets to set at room temperature for about 15 minutes, then refrigerate for at least 1 hour.
Add the Strawberry Topping
Once the tartlets are set, remove them from the refrigerator. Top each tartlet with slices of fresh strawberries and a dollop of whipped cream if desired.
Enjoy your delicious homemade Chocolate Strawberry Tartlets!
Pro Tips
- For an extra touch, consider dusting the tartlets with cocoa powder or chocolate shavings before serving. This will not only enhance the presentation but also add an additional layer of chocolatey goodness.
Ingredient Substitutions
If you're looking for a gluten-free option, try using a gluten-free all-purpose flour blend for the tart crust. This substitution works well, but it's crucial to follow the manufacturer's instructions to achieve the best texture. Additionally, for a dairy-free version, you can use coconut oil for the butter in the crust and substitute the heavy cream with full-fat coconut milk in the filling, ensuring a rich and creamy outcome.
For the chocolate filling, consider using a combination of dark and semi-sweet chocolate if you prefer a slightly sweeter taste. This balance can help tailor the tartlets to your personal flavor profile, while still achieving that decadent chocolate experience. Keep in mind that using a higher cocoa percentage can intensify the flavor, so adjust accordingly based on your chocolate preference.
Make-Ahead Tips
These tartlets can be mostly prepared in advance, making them a convenient choice for gatherings. You can make the tart crust up to a day ahead and store it in the refrigerator, wrapped in plastic wrap. The chocolate filling can also be prepared ahead of time; simply let it cool to room temperature and refrigerate it until needed. Keep it sealed to avoid absorbing any odors from the fridge.
When ready to assemble, fill the cooled crusts with the chocolate filling and let them set in the refrigerator. They can be held for up to 24 hours before topping them with strawberries and whipped cream. This way, you can save time on event day while still serving a fresh and delicious dessert that will impress your guests.
Scaling the Recipe
If you're hosting a larger gathering, scaling up this recipe is straightforward. Each batch of filling is ample for 6 to 8 tartlets, and you can easily double or triple the crust and filling recipes as needed. Just make sure to bake the tart crusts in batches if your oven space is limited; overcrowding can lead to uneven baking and inconsistent textures.
For mini versions, you can also use a mini muffin tin to create bite-sized tartlets. Just reduce the baking time for the crust to about 8-10 minutes, keeping a watchful eye until they are lightly golden. Mini tartlets are an excellent option for parties, allowing guests to indulge without the commitment of a full-sized dessert.
Questions About Recipes
→ Can I use other fruits on top of the tartlets?
Absolutely! Berries like blueberries or raspberries work wonderfully, as well as sliced bananas or even kiwi for a tropical twist.
→ Can I make the tart crust ahead of time?
Yes, the tart crust can be made ahead and stored in the refrigerator for up to 2 days before filling.
→ Is there a gluten-free option for the crust?
Yes, you can substitute all-purpose flour with a gluten-free flour blend to make the crust gluten-free.
→ How should I store the leftover tartlets?
Store any leftover tartlets in an airtight container in the refrigerator. They are best enjoyed within 2 days.
Chocolate Strawberry Tartlets
Created by: Genevieve Porter
Recipe Type: Favorite Baking Ideas
Skill Level: Intermediate
Final Quantity: 12 tartlets
What You'll Need
For the Tart Crust
- 1 ½ cups all-purpose flour
- ½ cup unsalted butter, cold and cubed
- 1/4 cup granulated sugar
- 1/4 teaspoon salt
- 1 egg yolk
- 2-3 tablespoons ice water
For the Chocolate Filling
- 1 cup heavy cream
- 8 oz dark chocolate, chopped
- 2 tablespoons unsweetened cocoa powder
- 1/4 cup powdered sugar
- 1 teaspoon vanilla extract
For the Topping
- 12 fresh strawberries, hulled and sliced
- Whipped cream (optional) for garnish
How-To Steps
In a large bowl, combine the flour, butter, sugar, and salt. Use a pastry cutter or your fingers to blend until the mixture resembles coarse crumbs. Add the egg yolk and ice water; mix until the dough just comes together. Form the dough into a disk, wrap in plastic wrap, and chill for 30 minutes.
Preheat the oven to 350°F (175°C). Roll out the chilled dough on a floured surface and cut into circles to fit your tartlet pans. Press the dough into the pans and prick the bottoms with a fork. Bake for 12-15 minutes or until lightly golden. Remove from the oven and let cool.
In a saucepan, heat the heavy cream over medium heat until it just begins to simmer. Remove from heat and add the chopped dark chocolate, cocoa powder, powdered sugar, and vanilla extract. Stir until smooth and fully combined.
Pour the chocolate filling into each cooled tart crust, filling them to the brim. Allow the tartlets to set at room temperature for about 15 minutes, then refrigerate for at least 1 hour.
Once the tartlets are set, remove them from the refrigerator. Top each tartlet with slices of fresh strawberries and a dollop of whipped cream if desired.
Extra Tips
- For an extra touch, consider dusting the tartlets with cocoa powder or chocolate shavings before serving. This will not only enhance the presentation but also add an additional layer of chocolatey goodness.
Nutritional Breakdown (Per Serving)
- Calories: 180 kcal
- Total Fat: 12g
- Saturated Fat: 7g
- Cholesterol: 40mg
- Sodium: 70mg
- Total Carbohydrates: 22g
- Dietary Fiber: 1g
- Sugars: 10g
- Protein: 3g